Van Tour
Size and Dimensions
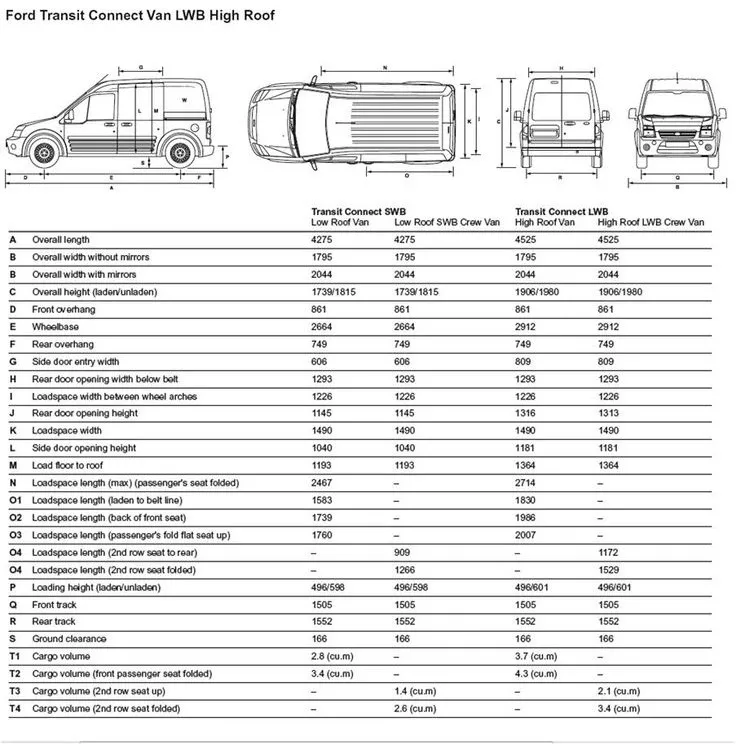
I chose the 2013 Ford Transit Connect (FTC) because of its efficient size and convenience. It’s a 178” long van, which is shorter than many 4 door sedans (a 2013 Corolla is 179” long), but the cargo bay is 81” (6’-9”) long in the back, allowing me at 5’-11”, to sleep comfortably. Boxy in form, the 2010-2013 1st generation FTC was sold as a LWB “high roof” version of its original European build, and has an interior cargo height of 54” (4’-6”), which is enough for sitting up on a seat without hitting my head on the ceiling. The interior height was reduced to 48” (4’) in the “sleeker” 2014-2023 2nd generation FTC, which would have eliminated the ability to sit up comfortably.
I can drive and park this van anywhere a car can go, comfortably hangout and camp in the back, while achieving 21/27 city/hwy MPG. As someone who wanted a compact daily driver and adventure vehicle in one, this van is the perfect fit, down to the inches.

Security
This FTC model does not have side or rear door glass. This was an important requirement because when I bought it, and for much of its life, I was in San Francisco Bay Area, which means car break-ins were inevitable. For an adventure van which could hold many valuable pieces of adventure equipment at any given time, I wanted to minimize the ability to steal items in the back as much as possible. This lack of glass, combined with the steel bulkhead behind the seats separating the cockpit with the rear cabin, makes stealing items in the back more difficult. The van has been broken in to a few times (through the front windows), and in all instances, the thieves did not get through the steel bulkhead into the back.

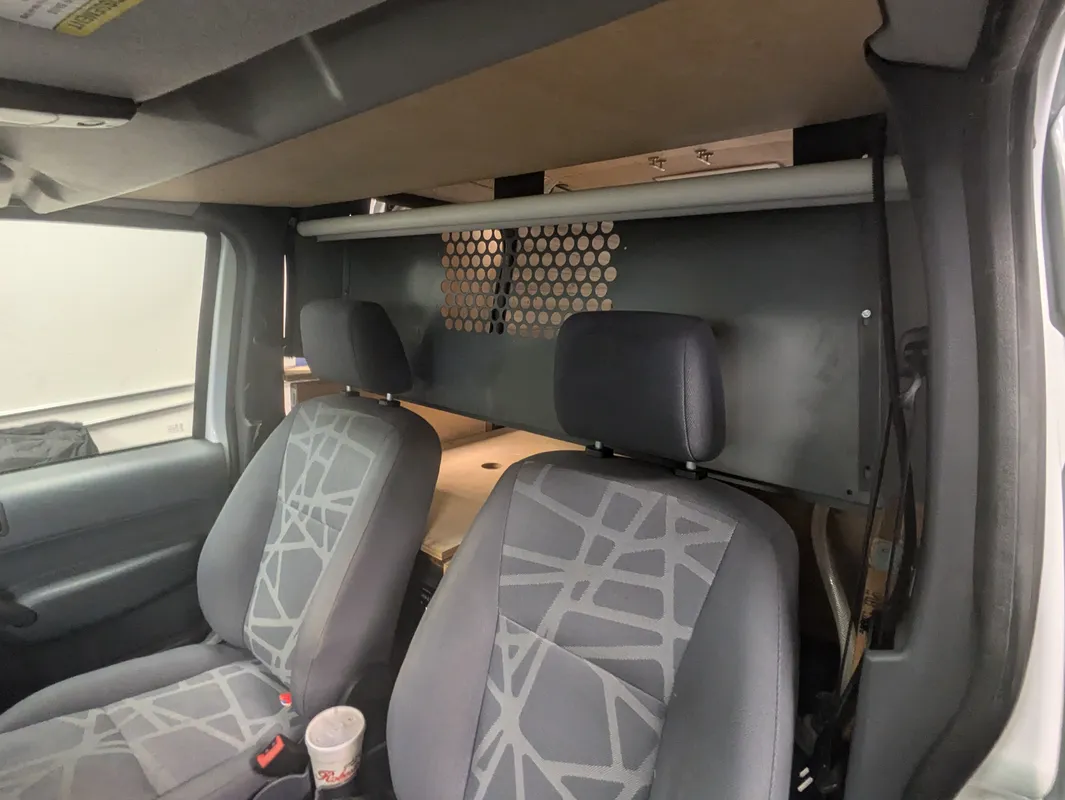
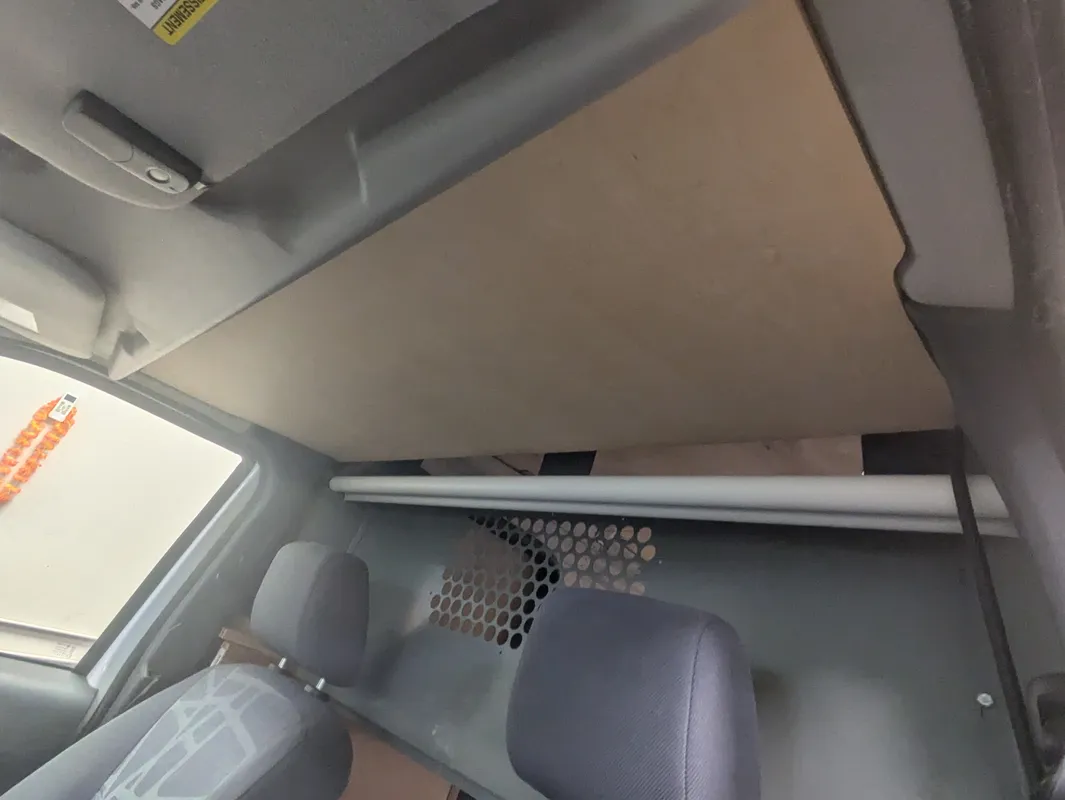
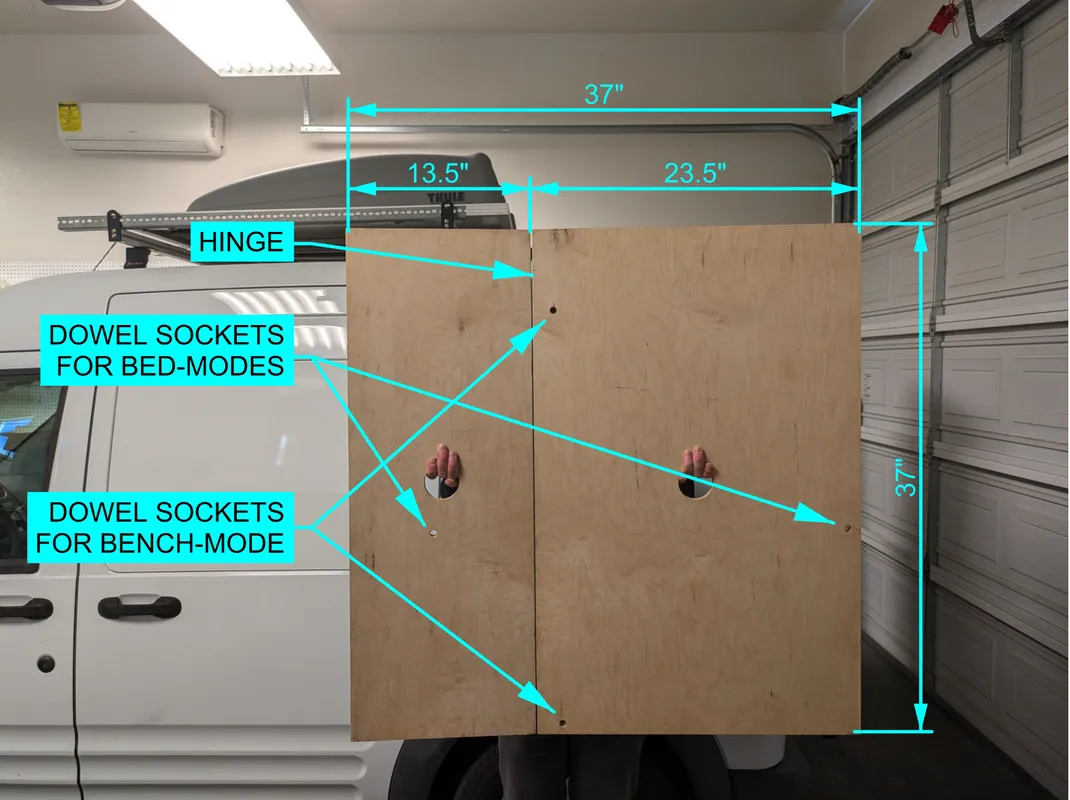
The trade-off with the steel bulkhead is that you lose the ability to jump from the cockpit to the rear cabin without exiting the van. This is a crucial feature for camping in bad weather or trying to be stealth. Therefore, I made the bulkhead easily removable and storable, to keep the van open when camping, while retaining the option for it to be secure in risky settings. The bulkhead can be opened and stored on the ceiling in a matter of minutes when removed from the back cabin.
Converting the bulkhead back and forth is useful for longer trips which include the occasional risky area. However for most short trips to remote locations, I keep the bulkhead at home to maximize available space. The bulkhead has also been modified to allow for access to the overhead storage when it’s installed.
For privacy, a retractable blackout curtain is installed in between the cabin and living area.
Cockpit
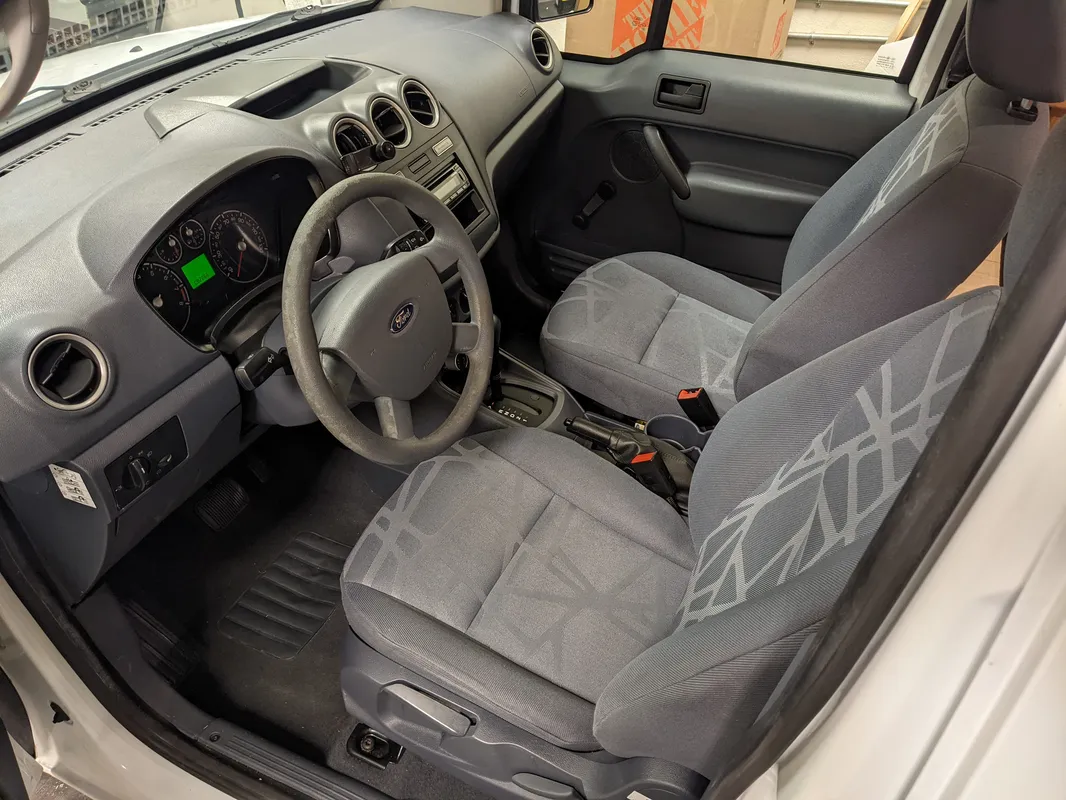
The FTC comes in XL and XLT trim packages. This van is an XL; meaning it has crank windows, no electronic locks or seat controls, and a basic stock entertainment system. However, I have upgraded the console to a premium stereo system.
Above the seats, I have extended the overhead shelf to be accessible from the living cabin. This deep shelf takes advantage of the tall ceiling over the seats.
Audio Mods
This van secretly has a great sound system. There are aftermarket Alpine speakers installed in the doors and a KICKER subwoofer bolted down below the drivers seat. Keeping in line with security concerns, the speakers are completely hidden from view behind the cheap stock plastic covers on the door, and the subwoofer is hidden below the seat and cannot be removed without un-bolting the seat from the car. The sound system is controlled with a removable alpine stereo tuner which can connect to devices via bluetooth.
Living
Simply, the cabin is a bench on one side, and kitchen counter on the other side, with a “hallway” passing from the cockpit to the rear doors. You can either enter the cabin by climbing in back from the cockpit, or the rear two doors.
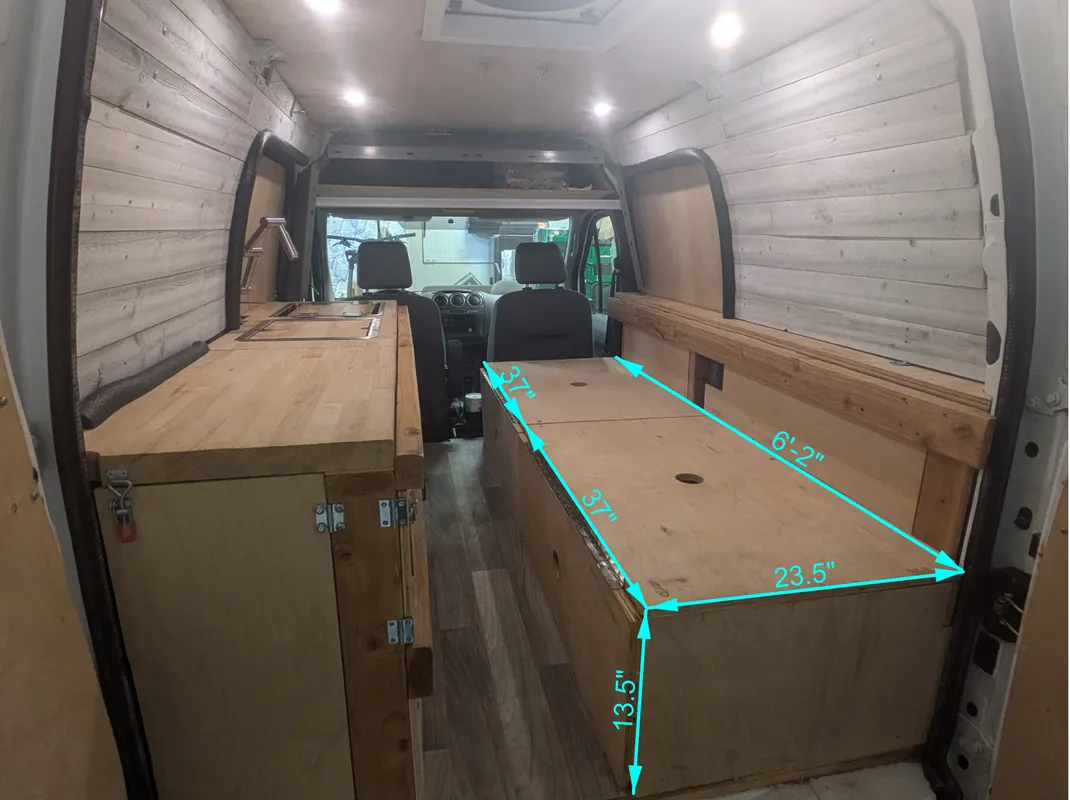
The living configurations are based around two module squares for sitting or sleeping. The squares are strategically hinged to fold into the seat and base of the bench, forming a 23.5in wide seating platform (the width of most sleeping pads and yoga mats), and 13.5” tall base (adding a ~3” cushion to this would create a ~16” high bench, which is a very common sitting height). Together, the squares form a 6’2” long bench, allowing most people to lay comfortably in the back of the van. When flattened, the squares can be rotated and spanned to sit on the kitchen’s ledge to form a twin sized (37”) wide platform. This “rotating square” allows a fold for the bench, which won’t fold and collapse when spanning across for a sturdy sleeping platform.
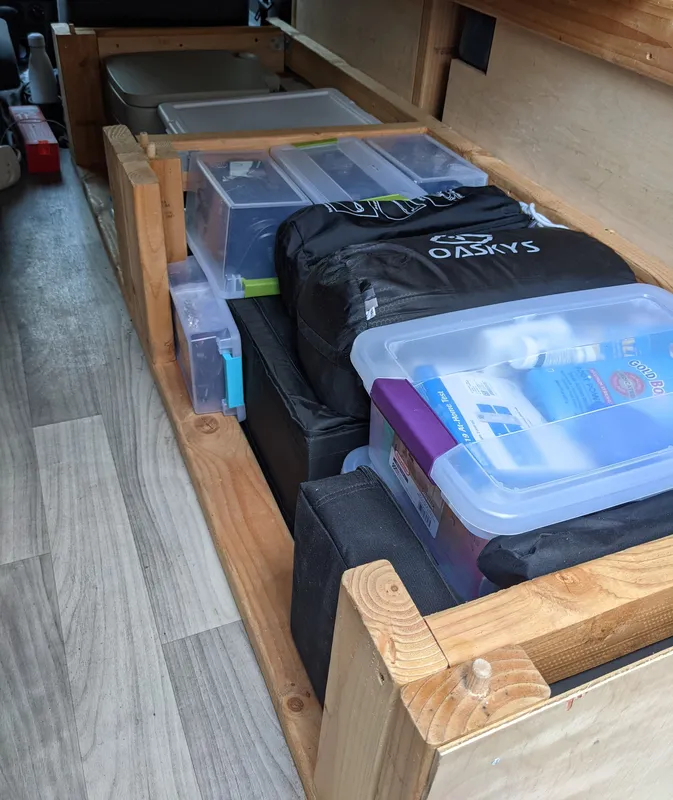
The squares can be easily removed to access the large storage area below the bench, or reconfigured to one of the sleeping configurations.
The living concept of this van is to have no permanent mattress or cushions for sleeping or sitting. Mattresses and cushions are very bulky, hard to store when not being slept on, and are magnets for filth and stains. Rather, this van expects that you will use standard sized sleeping mats or inflatable mattresses which are easy to store and keep the van spatious when not sleeping. This makes the van versatile for different user’s preferences, and is a great feature for renting out or having the van borrowed. Different campers can bring whichever sleeping mattresses/ cushions they prefer, and there is no burden of washing or cleaning upholstery or fabrics.
Sleeping configuration 1: “Quick Rest”
The bench is 23.5” wide, and will comfortably support most off-the-shelf sleeping mats. This allows a camper to quickly set up a mat to sleep on after climbing into the back of the van. This is personally my favorite configuration. Simple, minimal setup time, and I can sit up on the bench before and after lying down.
Sleeping configuration 2: “Comfortable Twin”
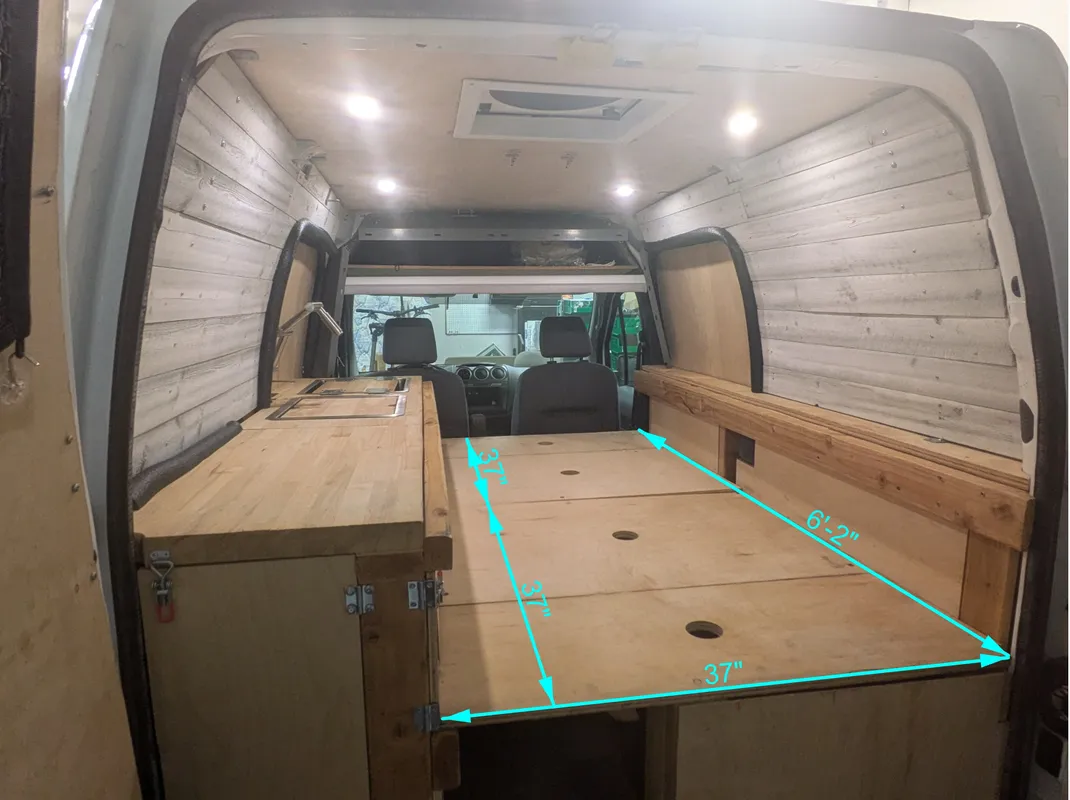
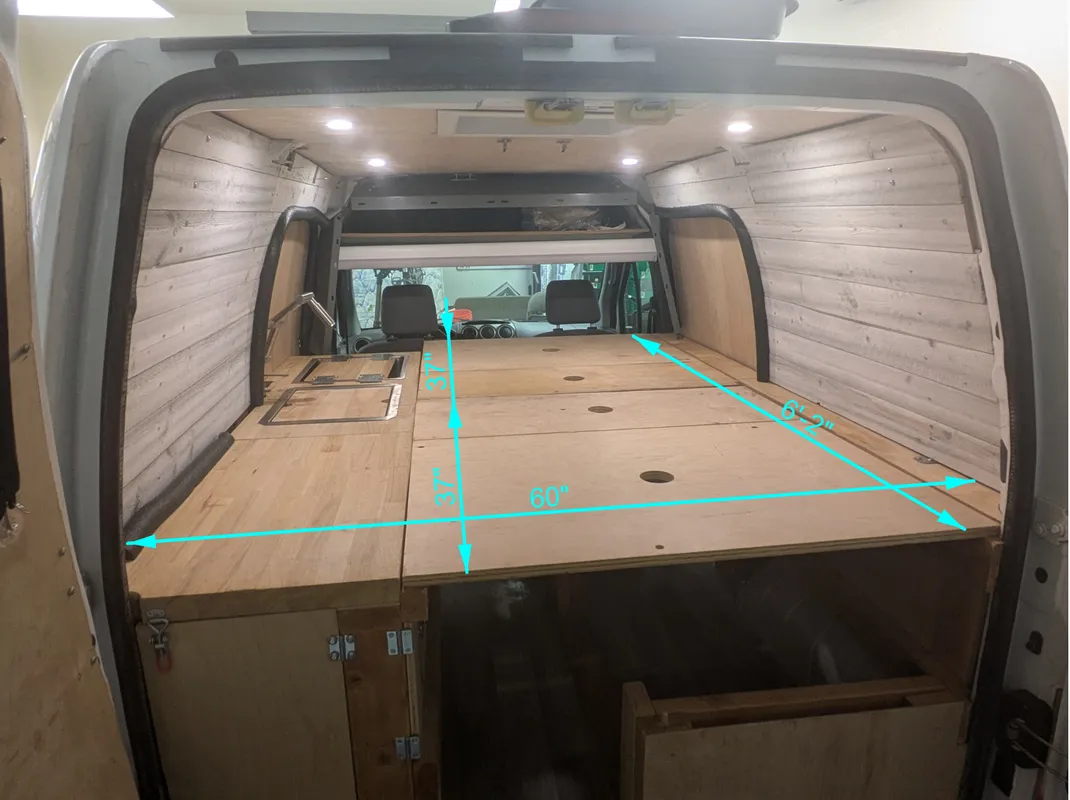
The squares can unfold to become flat and create a sleeping platform that spans from the ege of the kitchen to the back of the bench. This platform is 37” wide and 6’-2” long, which are roughly the standard “twin” bed dimensions. As such, this platform will comfortably hold an off-the-shelf twin mattress of your liking. While you could put a foam mattress here, for the reasons mentioned above, the simplest configuration is inflating a mattress when you’re ready to sleep. This configuration is roomy and comfortable for one camper, and can snugly accommodate two campers.
Sleeping configuration 3: “Queen Camping”
Similar to the twin configuration, the platform can span flush with the top of the kitchen counter to become a 60” wide (queen sized) sleeping platform. The kitchen counter is specifically designed with this configuration in mind; the sink faucet is mounted in back of the counter and can fold away, and the sink and burned basin have covers which are flush with the rest of the counter top. In this configuration, campers can use most off-the-shelf queen sized sleeping mats, or two twin mats in tandem.
Kitchen
The kitchen counter includes a flexible articulating stainless steel sink faucet, a soap dispenser, a stainless steel deep sink basin with a cutting board lid, and another stainless steel basin sized to hold a standard single burner propane camping stove. Below the burner basin is a mini-fridge. The under-sink area is accessible via a removable panel. Under the sink is the gray water jug, which the sink drains to. The jug can be easily removed for dumping. The kitchen has two large drawers which are both mounted on heavy duty slow-close drawer slides. Towards the rear of the kitchen is a large storage cabinet accessible via a small door on the inside of the van, or a larger door from the back when the van doors are open. The doors and drawers are latched when shut to prevent flying open when the van is in motion.
The kitchen sink and burner are located next to the door, so campers can “cook with a view,” have ventilation, and also cook from the outside if desired. The counter remains at a convenient height when standing on the outside, and the articulating sink faucet is flexible to allow for outdoor use. Additionally, the sink faucet can be used as a shower head when oriented towards the outside of the van.
Plumbing
The sink is supplied via a 5 gallon water jug behind the driver’s seat, and drains to a removable grey water tank below the sink basin. The fresh water jug is attached to a food-grade pvc tubing supply line via a custom made quick release nozzle, which attaches to a custom made “straw” extending to the bottom of the jug. The jug configuration is designed to be easily removed from the van for refilling on the go. The tubing runs to a 12V water pump which supplies the sink.
Electrical
The van has a robust electrical system powered by a 100AH deep cycle AGM RV battery which is charged by both the engine’s alternator and the 100W solar panel mounted on the roof. The alternator and solar electrical supply are mediated by the CTEK D250SA, which acts as a solar controller and intelligently draws from the alternator and starter battery when there is a sufficient surplus, ensuring the van’s starter battery remains full for its primary duty. Between the alternator and solar panel, the electrical system can easily and readily retain a power supply and replenish itself.
The battery supplies both AC and DC subsystems. On the panel behind the passenger side sliding door, there is a large blade fuse box for attaching the 12V DC items, such as the roof fan, lighting, and sink pump. Below the 12V panel is a 1000W inverter, which converts the supply from the 12V battery into a 120V AC current, which is the same as a typical household power outlet. This inverter can power most household items, such as the mini-fridge, rice cookers, water heaters, laptops, phones, etc. On the wooden post beside the electrical panel are the switches to turn the lights and sink pump on/off. There are also two marine-style “kill switches” next to the battery which completely cut the supply for either the AC or DC systems, as a safety feature. Additionally, there are common fuses placed throughout the system to prevent harmful imbalances.

Bike Rack and Storage Box
The bike rack is specifically fitted to allow for the doors to open with enough clearance. The bike rack also makes for a great “step” in and out of the rear of the van.
The roof storage box is accessible by stepping up on the van’s structure below the floor, and holding on to some roof-mounted handles.